You may be looking for some ways on how to share an internet connection using your globe tattoo or Smartbro broadband kit. The procedure is relatively simple. Just some few knowledge in networking and be able to follow simple yet detailed instructions. Sharing an internet connection using either globe tattoo or Smartbro WiFi kit has been a common practice by most "technically" inclined techies to be able to save on the cost of loading and individual purchasing of the WiFi kits.
However, there are several things to have to be able to share an internet connection using your Globe tattoo and Smartbro WiFi kits. Cables, computers, and of course the proper configurations. Let me also encourage (specially the newbies) to make some reviews on how to setup a home network and configuring ip's for LAN. So here is the tutorial for you so you can start sharing your internet connection via globe tattoo and Smartbro.
Things Needed For Globe Tattoo / SmartBro Internet Sharing
Several networked computers or at least two (OS : XP, Vista, or Win 7)
A Globe tattoo or SmartBro Wifi Stick
Procedure On How To Do Internet Sharing With Your Globe Tattoo or SmartBro Wifi Stick
1. First, you must have your computers have a network. To start with this, follow this procedure on how to setup a home network.
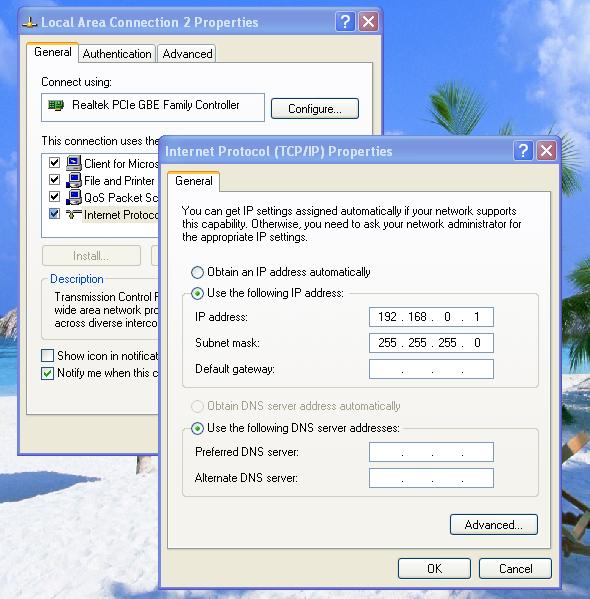
2. Once you have completed the networking procedure, we need to change the ip for computer with the internet connection. The computer that has Globe Tattoo or SmartBro dashboard installed SHOULD have an ip of 192.168.0.1 to serve as the gateway for the rest of the computers that are connected in your network.
To do this, go to "Control Panel" choose "Network Connections" and click right on the "Local Area Connection" and choose "Properties" and under the "General" tab highlight "Internet Protocol (TCP/IP)" and click on the "Properties" button. Do the same configuration like shown below.
For the rest of the computers in the network, have the configuration as shown below (use 192.168.0.2 , 192.168.0.3 , 192.168.0.4 and so on... for the rest of the computers). Please use the ip of the computer that we did a setup earlier as the gateway ip for the rest of the computers. Use the configuration as shown below.
3. Once you got to the "Network Connections" window, click right on "Globe Broadband - Prepaid" network icon and choose "Properties" then go to "Advanced" tab. Check the box under "Internet Connection Sharing" that says "Allow other network users to connect..." Just click "ok" and see to check your configuration below.
4. Disconnect and reconnect your Globe Tattoo or SmartBro dashboard and test if the computers in your network already has a shared internet connection. If you ran over a problem, please check if your browsers are configured to use proxies. Please disable the proxies. And also consider checking the gateway ip of the connected computers.
This is the procedure on how to share internet with Globe Tattoo or SmartBro. Though this example is for Windows XP, the procedure with WIn 7 and Vista is very similar. Our setup is currently running with eight computers all connected to a switch. We also tried running proxy servers on Globe tattoo but we need to configure each networked computers with the same proxy as the gateway computer is connected on. Who says you can't run VPN connections using either Globe Tattoo or SmartBro to be shared in a network, well try it yourself - it does work with us!


